
A Cost Effective Larsen Truss Design
by Robert Riversong

And, with the air-tight drywall system instead of vapor barrier and dense-pack cellulose, there's almost no thermal bridging and a 3 bedroom house can be heated with less than a cord of wood per year here in New England.
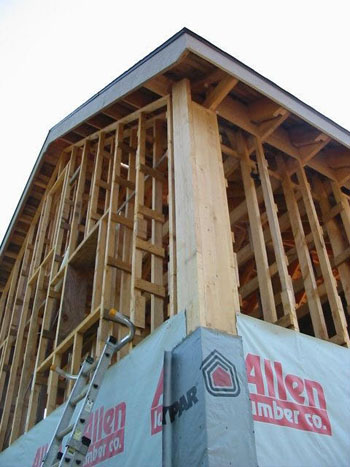
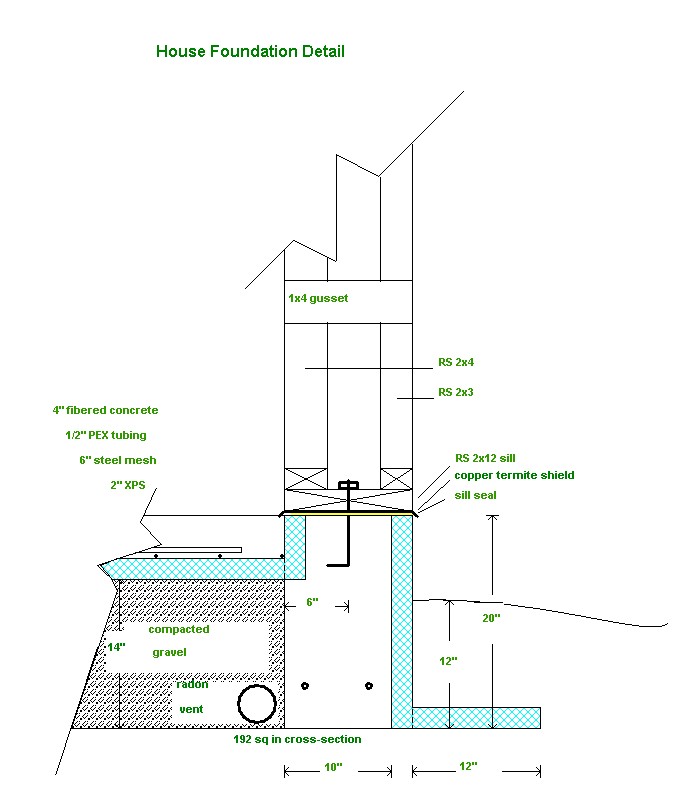
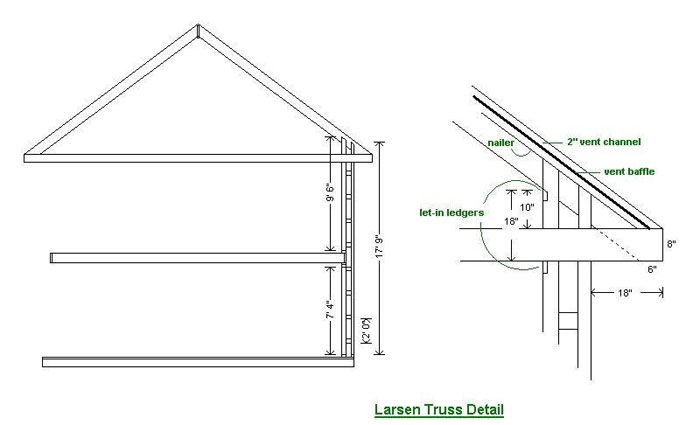
I also use native, rough-sawn green full-dimension lumber, rough-sawn subfloor and roof deck, and rough-sawn exterior trim. The load-bearing wall is 2x4 24" oc and the exterior chord of the parallel chord wall truss is a 2x3, extending from sill to rafter tail and attached to studs with rough-sawn 1x4 gussets 24" oc.
This creates a balloon-framed outer wall (which is erected after the roof is on) which bypasses the floor and ceiling assemblies and eliminates the problem of insulating and sealing the band joist area.
The second floor ceiling joists and roof rafters are supported by let-in rough sawn 1x4 ledgers, with the beveled rafter ledger 18" above the ceiling ledger to maintain full insulation depth of 16-18" (R-60+). The ceiling joists are cantilevered outward to form the soffit and meet the rafter tails (ceiling joists and rafters are lapped to opposite sides of each stud) with a 2" block in between to create a thrust-resisting triangle.
 I've used this system in western MA and here in north-central VT. I began with a full Larsen Truss applied to the outside of a diagonal board-sheathed load-bearing wall that was first wrapped with stabilized 8 mil Swedish Tenoarm vapor barrier, for the 1/3-2/3 Canadian system (4" of insulation inside the vb and 8" outside in the trusses).
My "modified Larsen Truss" system requires conventional platform framing of the first floor walls, second floor deck, and then eastern balloon framing of the second floor bearing walls (let-in ledgers to support ceiling joists and rafters).
For the air-tight drywall system, I use Tremco acoustical sealant between each framing unit (bottom plate to sill, band joist to top plate, subfloor to band joist, bottom plate to subfloor, etc), and then apply Tremco on the inside edge of the top and bottom plates as the drywall is applied, also using Lessco polypans behind each electric box to allow sealing the drywall around those penetrations.
Once the roof is framed and weathered in, I prefabricate lengths of 2x3 with 1x4 gussets gun-nailed to them 24" oc, stand them up on a bottom plate on the extended sill and, using the 12" gussets as the depth gauge, nail them flush with the inside of each wall stud to create a 12" cavity (2x4, 5" space, 2x3). I then stack additional half-chords (gusseted 2x3s) on top of those until I can tie them into the rafter tails on the eaves or outlookers on the gables.
This creates a continuous insulation cavity that bypasses floor and ceiling assemblies (no troublesome band joist issues), continuous over the ceiling and back down the other side. I install site-built MDF ventilation baffles between rafters and to block off the soffits. The outer frame is then wrapped with Typar, doors and windows installed (aluminum clad with nailing flanges), and 3/4" shiplap (pattern 105) drop siding nailed to framing.
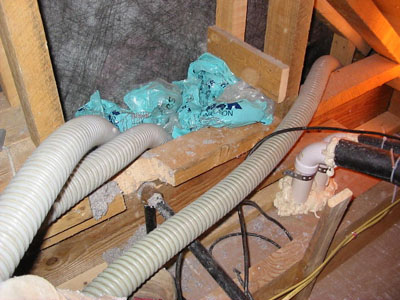 Once interior drywall is installed, I dry-blow dense-pack cellulose into the cavities, using a "leap-frog" system of multiple hoses pre-positioned in truss bays, because it takes special technique to get proper density in a cavity that is open both laterally and vertically - and I do my own insulating.
The open wall cavities makes the installation of mechanicals simple, since there is little drilling necessary. The three air barriers (drywall, dense pack, housewrap) make the walls virtually impermeable to infiltration. The dense pack cellulose makes the walls highly fire resistant and extremely quiet. Insects and rodents don't like the boric acid used as fire retardant in the cellulose, so these two universal problems are minimized or eliminated. The cellulose is more hygroscopic than wood, so it not only can absorb and release any diffused moisture that might get into the wall cavities but also draws any potential moisture away from the wooden frame, thus protecting it (foam insulations will do the opposite).
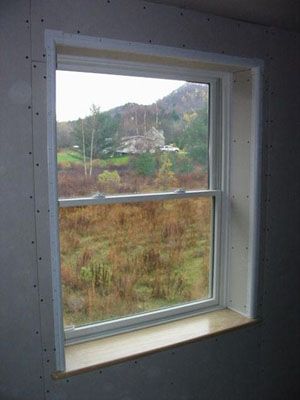 This wall system creates dramatically deep door and window returns, that I typically finish in drywall for diffusion of light into the living spaces. And, because the house has such a low heat loss, a moderate amount of passive solar glazing can contribute as much as 50% of demand, reducing the supplemental heat load to negligible amounts.
The 2000 sf house I just completed required 311 bales of cellulose, but we heated it with a few quartz worklights in zero degree weather. It has a design heat load of 16,500 btu/hr at -10°.
In addition to a 74% efficient woodstove with under-slab direct coupled combustion air inlet, the house has a 94% efficient direct vent condensing propane boiler which heats two zones of radiant tubing (in-slab 1st floor, and suspended 2nd floor), and an indirect domestic hot water tank.
Fresh air supply is by exhaust-only ventilation, using the Panasonic bath fans (one each floor) on 24-hour programmable timers as well as a kitchen hood, and passive make-up air inlets in each bedroom and in living rooms (Airlet 100 by Aldes). The propane dryer in the mudroom/utility room has its own make-up air supply through a louvered 6" duct, and the door to the kitchen is weather-stripped. This guarantees a minimum of 1/4 air change per hour, plus additional venting when cooking or bathing to eliminate moisture at the source.
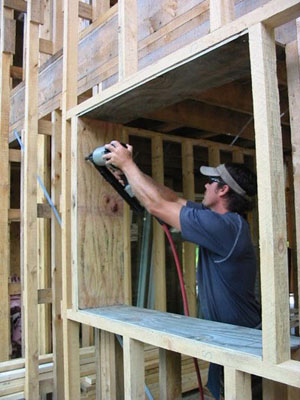 The only plywood in the house is for door and window boxes, as this makes a better air-tight seal than boards, and for a couple of interior shear walls. Let-in metal t-bracing in exterior and interior load-bearing walls and wooden under-rafter diagonal bracing sufficiently stiffens the structure, particularly once the sealed drywall is installed.
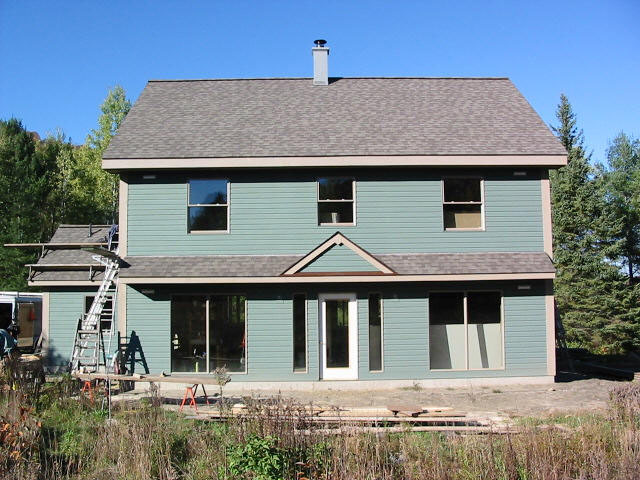
I was able to build this house for $105/sf, in part because of the designed-in savings of no 1st finished floor (tinted concrete), no sheathing, no exterior door and window trim (metal cladding only), and using band-sawn rough-sawn boards for corner boards, rake, fascia, and soffit. All lumber, including trim, was local hemlock.
The interior has a couple of rough-sawn exposed timber bents, with pegged braces, from a mill just up the road. And the drywall window returns - some with yellow pine sills - have bullnose corner bead for a softened transition.
I find that going from conventional construction to superinsulation adds no more than 5% to the cost of a house and the payback is enormous, both in energy savings and comfort. Some banks are offering higher debt-to-income ratios to mortgagees who buy or build highly efficient homes, since they need so much less income to operate it.
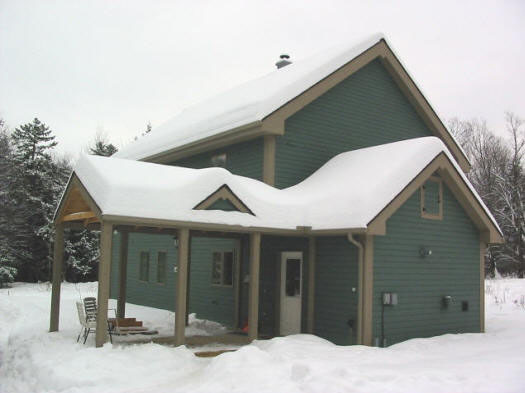
This house was rated 5+ stars by the Vermont Energy Star home program with a HERS rating of 46. The HERS (home energy rating system) Index is an energy efficiency range from 100 for a reference home built to the International Energy Conservation Code to 0 for a net zero energy home.
The Vermont Energy Code requires an index of 85 (15% more efficient than an IECC house) and Energy Star requires an index of 80 for northern climate zones 6-8. So a HERS index of 46 means this modified Larsen truss home is expected to consume 64% less energy than an IECC house, and 34% less than a threshold Energy Star home. According to the VT Energy Star administrator, this house tested in the top 5% of Vermont's Energy Star homes.
For Email contact go to About Us
Established in 2001, GreenHomeBuilding.com is primarily a labor of love. Kelly, and the GreenHomeBuilding team of experts, have answered thousands of questions for readers over the years, and we continue to publish up-to-date information about increasingly important sustainable architecture. If you feel moved to assist us in this work, your kind donation would be much appreciated; this can be easily done through our PayPal account:

VISIT OUR OTHER WEBSITES:
[Natural Building Blog] [Earthbag Building] [Dream Green Homes]
Disclaimer Of Liability And Warranty
I specifically disclaim any warranty, either expressed or implied, concerning the information on these pages. Neither I nor any of the advisor/consultants associated with this site will have liability for loss, damage, or injury, resulting from the use of any information found on this, or any other page at this site. Kelly Hart, Hartworks LLC.
