
Structural Considerations of Cordwood
 Rob Roy is Director of the Earthwood Building School, which has specialized in cordwood masonry instruction since 1980. Rob and his wife, Jaki, have built four innovative cordwood homes for themselves since 1975, including the Earthwood home where they have lived for over three decades. Earthwood is a 2400 SF two-story round, load-bearing cordwood home, earth-bermed and earth-roofed. Details of construction are in Rob's Earth-Sheltered Houses (New Society, 2006) and Cordwood Building: The State of the Art (New Society, 2003) two of fourteen books he is written in the alternative building field. Rob and Jaki have taught cordwood masonry in Earthwood Building School all over North America, as well as in Chile, New Zealand, Australia and Hawaii. They have helped scores of owner-builders with their cordwood projects, including homes, saunas and outbuildings. Earthwood has produced a 3.25-hour DVD on cordwood construction, which, with his books, can be accessed through the Earthwood website, or on the Cordwood page here. Rob is considered to be one of the leaders in the field of cordwood construction and earth sheltering. He does individual consultations at a flat rate of $75/hour, but answers questions here without charge. See also Earthwood Facebook.
Questions and Answers
Q: I wanting to build a round cordwood cottage with an interior space of 200 sq ft, so a diameter of 16 ft plus the wall width. I want the walls to be load bearing for they will be between 16" & 24". Do you have any suggestions?
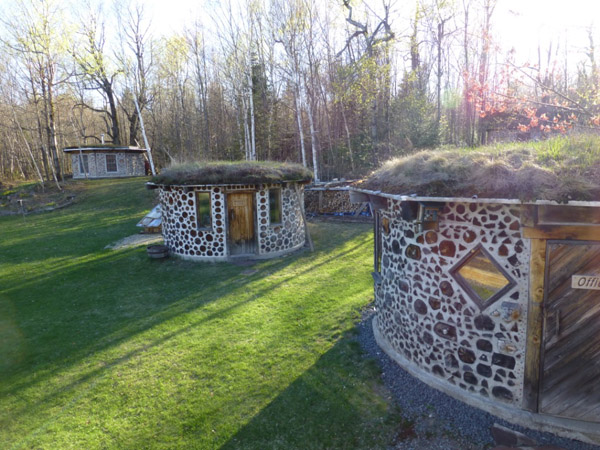
A: At a 16" interior diameter (8' radius), you will have 201 actual usable interior square feet. We have built two similar buildings. Our office was the larger (18' interior diameter, yielding 254 usable interior SF) and the library a bit smaller (14' interior diameter, or 154 usable SF.) In both cases, we went with 12" thick cordwood walls, and I do not recommend any more than that for such small buildings. Even with 12" walls, the square footage of the building's footprint (the way a tax assessor measures it) is 314 SF for the large one, 201 SF (your number) for the smaller one (16' outside diameter, 14' inside.) You can see that a lot of square footage is lost in the thickness of the walls, but when you add a 16" overhang, our little 16-foot outside diameter library has a roof area of about 273 SF (to enclose just 154 usable SF.) This is an important consideration with many thick-walled green buildings: cob, strawbale, cordwood, etc. But the smaller the building, the more foundation (and especially roof) it takes to enclose desired living space.
With thicker walls, such as 16" or 24", this inefficiency is further accented. Further, with small buildings, like the one you want to build, there is no benefit from a heating point of view with cordwood walls greater than 12" thick. (Our 10-foot outside diameter sauna has 8" thick walls and can be heated to 165 degrees in two hours with a wood stove, even in winter.) Simply said, the extra wall insulation does not justify very thick walls.
It should be noted that we installed a post at the center of both of our buildings described above. On top of the post, we installed a 2-foot wide capital, broadening the post sufficiently to receive the inner end of the 16 radial rafters. Even without the living roofs these buildings have, I feel the post is important to support the roof without resorting to extraordinary structural measures. Further, I do not advise cordwood walls as load-bearing in a seismic area. If you want a round(ish) building, go with an 8 or 16-sided timber frame, with cordwood infilling.
Q: My wife and I are starting a wildlife Rescue Center we would like to build a main Lodge in cordwood.We live in the northwest what should our wall depth be?
A: You have pretty good wood species in the Pacific NW. I'd go 16" minimum, but there's nothing wrong with 18", particularly if your cordwood is on the denser end of the scale, generally characterized by smaller annual growth rings.
Q: Are the cord wood walls load bearing?
A: Cordwood walls can be load-bearing, as at Earthwood, but I strongly recommend building within a post-and-beam frame. With the roof on, this enables you to work during inclement weather. And the timber frame also makes the local building inspector happy. It removes the need for convincing the inspector about the load-bearing characteristics of cordwood masonry, You need to do a lot of research about cordwood before beginning your project. All the best of success to you. Read books, look at videos, attend a workshop.
Q: Would it be reasonable to replace the existing stick-built exterior walls of a small ranch house with cordwood masonry walls? If so, would it be necessary to amend the existing foundation to support the new walls?
A: It would probably be necessary to beef up your foundation for a cordwood wall, but I cannot be certain, as you do not give any details about the existing foundation.
Q: My husband and I have agreed on building a cordwood home for our starter home.We have read books and taken a lot of notes on how to get started. Only one question remains: How would we add on in the future? We are starting out with a small 1 bedroom. Mainly because we are beginners. But in the future we would like to add on. If you have any advice, please let me know.
A: I am a believer in the add-on strategy. It makes sense to build as you can afford, and avoid getting a bank or other lending institution involved. However, the structural details of the add-on should be considered at the design stage, something you have a great opportunity to do. Many owner-builders do not plan for add-ons, making their job difficult later on. Here are examples of the kinds of things to consider:
(1) Plan add-ons for the gable ends, not the eaves. All too often we see people adding on a shed-pitched type roof to the eaves, which usually requires a lesser pitch than the main building, in order to provide enough headroom in the addition. Well, snow comes down the original roof, and collects on the shed-type add-on, causing leakage at best (ice dam) and structural failure at worst. Gable ends, on the other hand, are easy to extend without changing levels or headroom.
(2) Round houses are difficult to add on to, both from a structural and from an architectural (esthetic) point of view. The best way to add on to round houses, in my opinion, is to extend radial rafters outward from the center, creating a trapezoidal shaped room. It is architecturally pleasing, because the eye is still drawn to the center by the (probably exposed) rafters. We recently put such a sunroom addition on to the round Earthwood house in that way, covered in detail in my book Timber Framing For the Rest of Us (New Society, 2004).
(3) Foundations for the add-on should be prepared the same as they were for the original building, to avoid what is known as "differential settling." This is particularly important with cordwood masonry. But do not fear. It has been successfully done many many times. I like a floating slab foundation built on a heavily compacted sand pad, for example. When I add on, I create a similar compacted pad, and float the new slab on it. There is no difference in the settling of the two components. This is true with any kind of foundation, though. Just do everything the same as you did on the original building.
(4) Because of the rough texture of cordwood masonry, a new cordwood wall keys very well into an old cordwood wall, as we have seen time and time again.
(5) Keep architectural harmony in the building as a whole. Use unifying themes on the addition, such as wall texture, roofing, house lines, etc. Too many people, unfortunately, end up with a hodge-podge look to the house. This, too, can be considered at the design stage, even though it may be a year or several years before the addition is built.
I treat the subjects of the temporary shelter strategy and the add-on strategy in depth in my book Mortgage Free!: Radical Strategies for Home Ownership (Chelsea Green, 1997) Frankly, this is the book that I think will help you the most at the stage you're at now. Both books cited in this reply are available from us at Earthwood, www.cordwoodmasonry.com
Q: How thick would I need to make the walls to make the structure efficient to the extreme of temperature...ie -20 being the coldest?
A: Your walls should be a minimum of 16" (presuming a small home of energy-efficient shape.) With a larger home, you might consider wall thicknesses in the 18" to 24" range. Size and shape of home, orientation, number and size of windows, whether or not the building is earth-sheltered ... all of these things are important, too, not just wall thickness.
Q: My husband and I are very interested in building a cordwood home in northwest wisconsin. I am very new to home building so please bear with me...Is it possible to have a basement with a cordwood home? Is it possible to integrate electric and solar with it? Would it be smart to have like 2 feet of stone masonry at the base to minimize damage to the cordwood?
A: Wisconsin is the leading state when it comes to cordwood masonry, with a long history dating back to the 1800's. Modern cordwood homes in Wisconsin range from low-cost dwellings right through properties valued at a million dollars or thereabouts. All of the many homes with which I am familiar in your state have electricity. Many cordwood homes, including our own Earthwood in New York, make use of solar energy for electricity and for passive solar heating.
As for basements, our first home in New York, Log End Cottage, was built on a block wall basement, as have many others. Many cordwood masonry homes have been built on stone foundations, including foundations made by the slip-form stone technique popularized by Helen and Scott Nearing.
The latest collection of Cordwood Papers from the 2005 Continental Cordwood Conference (CoCoCo/05) held in Merrill, Wiscnsin on July 30 and 31 of this year, featured a fine article by Paul Kienitz about building a cordwood home on a poured concrete basement. This is just one of 27 new Papers in that collection, covering a variety of topics such as the use of lime putty mortar with cordwood, thermal performance of cordwood masonry, cordwood saunas, the use of "wraparound" log-ends, many case studies and lots more. The 125-page book (lots in color) is now available through Earthwood Building School at $30 postpaid. (Earthwood, 366 Murtagh Hill Road, West Chazy, NY 12992.) An excellent second document came out of CoCoCo/05 called Cordwood and the Code: A Building Permit Guide. It includes a CD and is also available from Earthwood at $26 postpaid. Cordwood author Richard Flatau, Daycreek.com creator Alan Stankevitz, and myself were co-editors for these documents. Richard and his wife, Becky, deserve a lot of credit for bringing over 225 people together for CoCoCo/05. Check www.cordwoodmasonry.com for more information.
Q: We are building an experimental shelter using a number of alternative building techniques. We intend to have our structure made out of timbers and would like to incorporate a cordwood wall. Considering the infill technique (ie. the timber frame is complete, bents attached to side girts and rafters installed) how does one lay the last course of cordwood between the built-up cordwood wall and the beam, or between the built-up cordwood wall and the rafter (sides and peak). Feel silly about this, but can't quite figure out the solution. Aside from messy stuffing, how does one do it?
A: There are many different ways to attend to the detail of meeting the underside of a girt (sometimes called a plate beam) or heavy rafters. Meeting girts: If the girt is the same width as the cordwood wall, tack a piece of one-inch thick extruded polystyrene (such as Dow Styrofoam) to the middle part of the underside of the girt. The width of this insulation piece should be about a third of the wall's width on narrow walls (8" to 12" cordwood walls) a little more with wider walls, such as 8" for a 16" cordwood wall, or even 12" with a 24" thick wall. Now, as you lay up your wood, jam the last course of cordwood right up to the rigid foam. (This establishes a consistent one-inch final mortar joint). Then, load the back of a trowel with mortar, and hold it up the gap with one hand. With your other hand, use a pointing knife to push the mortar off of the back of the trowel firmly into the gap between the girt and the last course of log-ends (or vertical mortar joints between log-ends). You will find the the rigid foam provides an excellent resistance against a firm pressure with the pointing knife.
Near the top of a cordwood panel (within post-and-beam frame), hard-to-reach voids between the inner and outer mortar joints can be filled with sawdust insulation or bits of glass fiber insulation (use eye and nose protection with fiberglass.) To install sawdust, make a vibrating tool from a 10" by 4" piece of aluminum flashing or printing plate. Slightly bend it down its length to make a kind of a trough. Load one end of it with your sawdust and then vibrate the insulation down the trough and into place in the wall.
Meeting rafters. Generally, rafters are much narrower than a cordwood wall. At our new sun room addition, for example, the rafters are 5" by 10" but the cordwood wall is 16" thick. We solved the problem by completing the final course with 11" long log-ends, built right up to the side of the rafters. The rafters, then, show only on the exterior. The cordwood goes right up to the ceiling on the interior, the last mortar joint finished as per the paragraph above about finishing to the underside of girts.
With clear-grained log-ends (no knots), it is an easy matter to split exactly the right size and shape of piece to fit awkward spaces. Mark the log with a pencil where you want to split it. Set a single-ended axe or hatchet on the pencil mark and split the wood off by hitting the blunt end of the axe with a heavy hammer. Wear eye protection to guard against the chance of flying metal shards. Hope this helps! Thanks for the useful question.
Q: I live in central Louisiana and am planning to build a 1900 hundred foot post and beam home with a 16 inch exterior cordwood wall. The interior walls will be standard 2x4 framing sheathed in red oak that I have cut and had sawed on the property. I plan to make the cordwood walls from young pine or pine sap wood since southern pine does not develop yellow pine or heartwood until it is in its late teens or early twenty's. Any way my question is: Can I lay a gravel filled 2x4 mud seal on my slab and build my cord wall on it up to a top cap, as I have seen illustrated in strawbale designs? My interest is in tying my interior and exterior walls solidly together. I can easily do that with a mud seal and top cap to nail to.
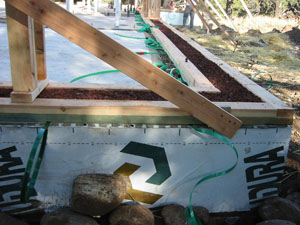
I got the mud seal idea from a DVD titled: The How-to Guide to Building with Strawbales (Post & Beam Infill) by Andrew Morrison at www.StrawBale.com . His mudseal was a pair of 4x4s spaced the width of the bale and anchored to the slab with anchor bolts. The void between the 4x4s was then infilled with dry washed gravel to fill the voids and support the bales. This system would help protect the first course from moisture by getting it off the slab. In wet environments, he recommended running tar paper under the first coarse and up to the third coarse on the outside . He drove nails in the top of the mudseals and left the heads sticking up to give the bales something to grip. Something like that may give the first coarse of mortar something to grip, making for a more solid nonloadbearing infill wall. When the walls were coated with stucco the wood was wrapped in tar paper and coated over also so the 4x4s were not visible.
This seem to me like a good way to protect the first coarse in a cordwood wall. I plan to use standard framing in my internal walls and I think a mudseal and top plate on the cordwood wall would give me a solid tie in to help prevent side to side movement in the top of the internal wall.
 A: We actually used a similar method for protecting the bales of a strawbale guesthouse here at Earthwood, and it has worked well. I don't see why it wouldn't work with cordwood, too. With standard 2x4 material, mortar joints would each be 3.5" wide, at least on the first course. The nails you speak of will help to give a better mechanical bond between the 2x4 mudseal and the first course of mortar, but I do not recommend this method along the sides of window and door frames. (What happens, in these cases, is that when the jambs shrink, they pull the mortar away from the cordwood, leaving a ragged tear in the mortar. Better to use a wooden key piece, such as a 1x6, fastened to the middle of the jambs.)
For the wooden plate at the top of the cordwood wall, I recommend that it be double thick, such as two courses of two-by material, one course lap-jointed over the other. This transforms the plate into a single monolithic ring, with much greater tensile strength than a plate made of a single two-by course with the pieces simply butted up to one another. The picture which Kelly has supplied shows such a lapping on the mudseal, but it is even more important on the top wall plate, as the mudseal is already mechanically fastened to the foundation.
Q: I am close to starting construction using your post-and-beam sauna plans. How are the post-and beam framework attached to the anchor bolts. Are they just guides that the post slide over or bolted down in some way.
A: The pins are simply positioning pins. They should stick out of the foundation by 1.5" to 2". Set the post on them, hit the top of the post with a sledge, making an impression. Take the post down and drill a hole at the impression at least as deep into the bottom of the post as the anchor pin is high. Reset the post. Plumb and brace. Be sure to use a damp proof course between post and foundation. This heavy building is not going to leap off the pins. They just hold the posts in position. The use of two pins at a post (or a doorframe, particularly), will stop the member from rotating.
Q: We are thinking of buying a cordwood home and have viewed it twice, my husband is wary because he saw some shrinkage around the wood and some pieces looked as if they had been damp at the bottom of the structure in one area. Can you give us pointers to what to ask and look for to know if it is a good construction or not as we are unsure if it will cost us a lot to heat and to maintain. Thank you in Bracebridge Ontario.
A: It is impossible for me to comment on a particular case without actually being right there to see the home. However, here are some considerations that come to mind:
1. You do not say how thick the walls are in the home. The walls should be at least 16" thick in British Columbia, even thicker in inland high altitude cold areas.
2. Staining low down is not an indication of rot or deterioration. This staining may have occurred very early during construction. It can happen for a variety of reasons, but if the wood is not "punky" (soft to the touch), everything may be just fine. Physical examination is a better indication than visual, in this case.
3. Shrinkage around the wood can be attended to in a variety of ways. If all of the log-ends in the home have shrunk, the best solution is to purchase several 5-gallon pails of Log Jam log cabin chinking, and apply it as thin as you can to the mortar joints and let it close the gap between the log-ends and the mortar. Log Jam (and Perma-Chink, a similar product) will close up to a quarter inch gap quite easily. These products remain flexible for a long long time. A side benefit is that you will return all of the mortar joints to a consistent texture and coloration. Log Jam comes in five different colors, but I like the one called Mortar White , because it brightens the wall, making the rooms lighter. You may like to do both sides of the wall. This is expensive ($140 a 5-gallon pail, last time I checked) and time-consuming. Do not buy it in caulking tubes. That is twice as expensive. You don't say how big the house is, but you will be into the project for several pails, maybe as much as ten. You will end up with a beautiful wall, however. Incidentally, if the original builders did not leave the wood "proud" of the mortar background by a quarter inch or so, this solution is much more difficult to do nicely. The work will be twice as slow because you will need to be careful not to smear the product over the end-grain of he logs. With log-ends extending a bit, it is an easy process.
4. If only a few large log-ends have shrunk, fill the gaps with clear siliconized caulking, cheaper than 100% silicone. Or, you might find "mortar caulking" at your supply yard of a similar color to your mortar. Buy one tube and try it first for appearance. There's nothing worse than an incompatible color, which looks tacky, to say the least. And do not use this orange spay foam stuff. I have seen this done a dozen times, and every one is an aesthetic disaster.
Q: Have there been any studies as to the wind handling capability of cordwood homes incorporated with timber framing? I need to be able to withstand a category 5 hurricane (approx. 140 mph winds), to convince the building inspector.
A: The short answer is: No, there haven't been any studies (to my knowledge) about "the wind handling capability of cordwood homes incorporated with timber framing."
The long answer is that you need to follow local codes with regard to wind shear with timber framing. Florida, Hawaii, tornado alley and other places have adopted "continuous load path" codes. Basically, this means that the posts must be mechanically fastened to the frame, the girts and girders tied down to the posts, the joists and rafters tied to the girts and girders. In other words, they want a "continuous load path" from the top of the house (usually some sort of peak) right to the foundation. Simpson Strong-Tie Co., Inc ( www.strongtie.com ) and USP Lumber Connectors and others manufacture relatively inexpensive code-approved connectors. See also my book Timber Framing For the Rest of Us (New Society, 2004), particularly Chapter Four. The book is available from Earthwood at www.cordwoodmasonry.com
The cordwood must be locked into the timber-frame with wooden key pieces fastened to the middle third of all edges of the framework adjacent to the cordwood masonry. This compartmentalizes the cordwood into a series of square or rectilinear panels around the building. Wind will not impact the cordwood, as long as the framework is tied down. In fact, in seismic (earthquake) areas, where continuous load path codes are also in effect, the worst damage that would occur to the cordwood (during a quake) would be masonry cracking. And this is with the whole building being subjected to shaking.
My approach with the building inspector would be to say that you intend to meet continuous load path codes for a timber frame (ask for their guidance in this), and that the cordwood masonry is a very heavy infill that provides compression strength to the underside of the girt system, and replaces the temporary diagonal bracing used during construction to resist racking in high winds. (It is necessary to have a strong diagonal bracing system for timber framing no matter where you build. Again, see Timber Framing for the Rest of Us.)
Q: I am wanting to build a 28 ft cordwood roundhouse, with a living roof. I am looking for building plans to build without a center post as a support. Rob Flato, cordwood expert, advises, the center post, with rafters, but I know there must be a way to use a living roof without the center post.
A: My friend Richard is absolutely right. There is no way to put a living roof on a 28' diameter round cordwood house (or even a 20' diameter cordwood round house) without a center post. No way economically, at least. Anything is possible if you throw enough money at it. But, in this case, enough money would be in the six figures. Put in the center post. Or radically change your design goals.
I have over 30 years of experience with living roofs. Recently, we built Stoneview, a 22' diameter cordwood octagon with a "light-weight" living roof of 125 pounds per square foot. I'm sure glad I have a nice center post and 16 strong (4" by 8") radial rafters. It is not overbuilt, but correctly built.
Q: I am thinking of building a garage and was wondering how tall I could go with a load bearing cordwood wall.
A: I'm writing to you from a two-story load-bearing cordwood home with a very heavy earth roof load designed to support 180 pounds per square foot. The house is round, which a garage would not be. With a rectilinear load-bearing cordwood wall structure, you will need to use stackwall corners. Corners are built up of crisscrossed squared timbers, then the regular cordwood masonry fills the space between corners. I don't see any reason why you couldn't support two stories that way, and I know that some people have. However, an unheated garage doesn't need the thick walls that work well with stackwall corners. Our garage is 24' by 28'. I used 8-by-8 posts and beams for a timber frame, and then put a truss roof on with a good overhang. Then I was able to do my 8-inch thick cordwood masonry under the protective cover of the roof, a real advantage.
Finally, you don't say where you are building. but if you are in a seismic zone or hurricane or tornado area, such as the west coast, the plains states, Florida or Hawaii, I would definitely insist upon a strong timber frame with cordwood infilling. And I am pretty sure that any building inspector in those areas would insist upon it. We're in northern New York, so we did not need what is called a "continuous load path" from the top of the building to the foundation, as required in the areas mentioned.
Q: My husband and I have been researching building a stacked wall or cord wood wall home. You have a plan for a octagonal guest cottage using the technique with a post and beam structure with the fill being cordwood walls. My question is regarding using bamboo for the post and beam structure and the roof rafters in such a plan. The span would not be that great and it would enable us to feel a little more confident about trying out some techniques such as using bamboo for the supports. Do you have any ideas on this, or do you think this could be a reasonable plan and any ideas on how to access the suitable sizes of bamboo and modifications which would be needed?
A: I am sorry to say that I am not qualified to comment on the use of bamboo for a post-and-beam frame or as rafters. My medium is wood. You need to go to a bamboo builder. However, it strikes me that a problem with bamboo and cordwood would be that there is practically no contact point between the cordwood masonry wall and the smooth round edge of a bamboo "post." Even a "double-wide" post and beam frame of bamboo may not adequately address this problem. It is not an issue of strength; it is an issue of poor contact points between the mortar and the bamboo.
Q: Can stack wall corners be used with a hexagon shape home?
A: Yes, you can use stackwall corners to build a hexagon home. Just cut the proper angle (120 degrees) into the ends of the corner quoins. See Chapter 7 (Octagons, Hexagons, and Other Shapes) of Cordwood Building: The State of the Art (New Society, 2003) for a thorough discussion, including a diagram (fig. 7.9 on page 60) of how to make Lomax stackwall units for a hexagonal cordwood building. Beware, however, that there is an error of labeling on that drawing. It should say that angle X (LX) = 120 degrees, not 150 degrees. I'll need to get that fixed on future printings. The error has escaped me until now.
However, you must give some serious thought about the roof system that you will build over this structure. The important consideration is to prevent outward thrust on the cordwood walls, which, by themselves, are weak on tension. The best and easiest way I can think involves a two-tiered approach:
First, run a double-coursed continuous wooden plate around the top of the cordwood wall, so that one course overlaps the other, with strong fasteners between them. Each course of plates should be made of 2-inch thick planks. The width of the planks should be selected to make sense with the width of the cordwood wall. In this special instance (plates over a load-bearing cordwood wall), I use plenty of roofing nails extending a half-inch out of the bottom of the lower course of planks, so that they form a good mechanical bond to the topmost mortar joint.
Second, use a good strong post at the center to provide a reactionary thrust to the roof load. It will probably be necessary to broaden the width of this post at its top by the addition of a capital wide enough to receive the several rafters which are part of the radial rafter system of the hexagon roof system. The easiest (and, in my view, best) roof system for a hexagonal building would involve the use of six triangular roof facets, pitched upwards to the center. If the center cannot deflect - and it cannot because of the post - then outward thrust on the tops of the walls is averted.
Although the cordwood walls of our octagonal Stoneview guesthouse at Earthwood are not load-bearing (in favor of a strong octagonal timber frame), we still used the strong post and capital, as well as a radial rafter system, as the roof structure, in part to further reduce outward thrust on the eight wall panels. See my Stoneview: How to Build an Eco-Friendly Little Guesthouse (New Society, 2008) for details on the post, capital, and radial rafter system.
Finally, I would point out that the stackwall method of cordwood masonry puts the builder at the mercy of the elements (sun and rain on the mortar) until the full wall height is achieved and the roof installed. If you were to build a strong 6-posted timber frame, with roof installed first, all the cordwood work can proceed under the umbrella protection of the roof and roof overhang. See Figure 7.5 on page 58 of Cordwood Building for an interesting way to make corner posts for a hexagonal building. The tops of the posts would be joined by six strong wooden girts, prior to roof construction.
Q: I don't know if this is possible, but with the proper water proofing procedures or an additional barrier, can one build an earth-sheltered cordwood home in Alaska? Ideally, I would love to have approximately 1/3 of the home exposed (circular design nestled against an incline and backfilled on the sides with an earth roof).
A: I believe it is possible to waterproof a cordwood wall. That was our original intent at Earthwood back in 1980-81. In fact, we began to build the below-grade portion with dry hardwood cordwood, not knowing at that time that this wood was unsuitable. When it took on moisture from water collecting on the slab, the wood swelled, causing the curved wall to tilt outward. We were three inches (3") out of plumb at six feet (6') of height. We had to tear the wall down. After trying expansion joints - unsuccessfully - we tore the wall down a second time and fell back on our tried and proven method of surface-bonded concrete blocks below grade. Have you considered that? We are very happy with the results. The white wall is much brighter than cordwood masonry in a dark area, and we have plenty of good thermal mass in the sand-filled blocks, with two to three inches (2" to 3") of extruded polystyrene properly installed on the exterior. Now we tell people that even if we could have built the below-grade portion with a more favorable wood, we would still go with the blocks: they are faster, better mass, and much brighter.
At our sauna, we tested waterproofing a cordwood wall, and it seems to have held up well for almost 30 years. Here is our method:
1. Keep the outside of the wall as smooth as possible. Let any irregularity in log-end length appear on the interior. "Flush point" (no recess) the exterior.
2. Apply a "scratch" coat of plaster. A good mix is three parts sand to one part masonry cement (3:1, sand to masonry cement). Smooth sand, no pebbles.
3. Scratch the first coat with your trowel, creating a diamond pattern of small grooves in the plaster.
4. Within a day, apply a finish coat of the same mix, making the surface of the wall into a fairly true cylinder. Let this second coat dry thoroughly.
5. Apply W.R Grace surface conditioner to the second (finish) coat.
6. When the surface conditioner has dried, usually within an hour, apply W.R Grace Bituthene 3000 or 4000 waterproofing membrane. With the Bituthene 4000 membrane, W. R Grace supplies enough surface conditioner to do a roll. You will get about 190 SF per roll. See also my book, Earth Sheltered Houses, available from us at Earthwood at 366 Murtagh Hill Road, West Chazy, NY 12992. The cost would be $30 media mail to a US address.
7. Put appropriate extruded polystyrene, such as Dow Blueboard, over the waterproofing membrane, according to insulation requirements for your area. You can't glue the rigid foam to a curved wall, but you can physically hold it against the wall while you backfill.
8. Use good draining backfill or, failing that, a composite drainage matting against the polystyrene insulation. Again, see Appendix B of Earth Sheltered Houses, particularly pages 231 and 232 for a list of suppliers.
While I believe this method to be effective, I have no control over variables on site: kind and dryness of wood. build quality, etc. The ideas here are offered as a suggestion. Ultimately, you're on your own!
Q: I have plans to build a 43x23 load bearing stackwall cordwood house. My plans are to build with cob and cordwood. I am wondering if I am able to use the cob to go two full stories (17ft) high for the walls without a post and beam skeleton.
A: Stackwall corners are okay if done well on a good foundation. I wouldn't embark on a stackwall-cornered project myself, because I would be at the mercy of the weather until the roof goes on. I would think that in Maine that would be a particularly important consideration.
Q: How high of a wall can I build with cordwood construction? Post construction with cordwood in between.
A: Within a strong timber frame, the sky is pretty much the limit to cordwood wall height. Generally, though, timber framed panels are not over 8 feet high. Incidentally, our load-bearing 16" walls at Earthwood are about 15 feet high and have caused no problems after 30 years.
Q: We built a cordwood/strawbale (earth plaster cordwood knee wall with strawbale on top) home that we moved into Nov 2010. We live in south-central Colorado in the Sangre de Cristo Mountains and experienced a fairly cold winter. We had big problems with condensation. We used propane space heaters for reasons I won't get into here, and have a rocket stove that didn't work to expectations. We're thinking of installing a direct-vent heater and would have to go through the wall of our cordwood; we're worried about cracking and others problems we don't have experience enough to anticipate. Rob, do you have advice as to the best way to approach this?
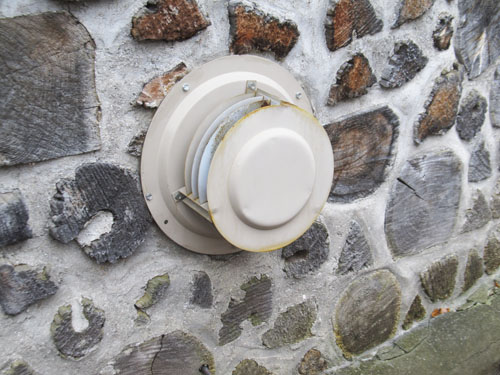
A: They say a picture is worth 1000 words, so I attach a picture of a direct vent for a gas heater that we have used at our Earthwood office for many years. No problem. And it was installed as a retrofit, not during original construction, so you should be able to do it too. First, find a loose or tapered log-end and, with the sharp impact of a hammer, remove it in the direction it wants to go. Then chisel away the mortar around it, and continue to pull nearby log-ends into the hole you have created until you have a space a little bigger than you need. Install the vent, which will probably be of double or triple-wall construction, and mortar up to it by way of repair.
Q: I'm building a load bearing cordwood dog kennel, and I can't seem to figure out how to securely attach a top plate and rafters. Do you just lay in your rafter beams with a plate underneath each beam and mortar all the way up to the top?
A: The best way to proceed to a roof system is to install a wooden plate all the way around the building, lapping one course over the other. For example, with 8” thick cordwood walls, make your plates from full-size two-by-eights. Get all your stackwall corners up to the height. Then, on the front and back walls, build the cordwood up to a height one inch lower than the stackwall corners. Do not install the last inch of mortar yet. In fact, it’s a good idea to let the whole structure sit for a couple of days for the mortar to harden. The stackwall corner quoins and all the log-ends are complete, just not the final topmost mortar joint. On the sidewalls, the tops of the log-ends should be one-inch above the height of the stackeall corners.
We’ll do the end plates first. Install the last inch-thick mortar joint. On the front and back walls, so that the mortar is the same height as the stackwall corner quoins. Use a straight edge to get this right. Now, this is the only place in cordwood masonry where I nail in a number of roofing nails (with their wide heads) into the underside of the plate, in the inner and outer third of the board’s width; that is: where the mortar joints are (assuming that you are insulating the mortar joint.) Leave the roofing nail heads sticking out of the plate by a half inch, so that you will have a mechanical grab to the mortar. Nail spacing could be every three inches. Do not put nails where the plate will be over the quoins, just where the mortar is. Set your front and back plates onto the mortar and directly onto the stackwall corner quoins (no mortar here.) Screw the plate to the quoins using 4” screws. Now you have your front and back plates installed, and you have effectively increased the height of the building so that, now, the top of these plates are an inch higher than the tops of the log-ends on the sidewalls.
Cut two plates from a 2x8 plank. Install roofing nails as before, but not in the last 8 inches at the ends of the plates. Install your sidewall mortar joints. Place the sidewall plates down into the mud so that the roofing nails get a mechanical bond to the mortar. You are overlapping the front the back plates, and fastening the sidewall plates to the end plates with four 4-inch screws at each corner. Point the mortar.
You have created a very strong rectangle of 2x8 material on the top of your cordwood walls. Now you can install rafters, trusses, whatever. If your plan is slightly different from what I have suggested – a single pitch roof to the rear, for example, instead of a Snoopy doghouse – just make adjustments. You have the basic idea.
You said "kennel" and I presumed a small doghouse. If the building is larger, say 10' by 12', the principal is just the same. On a larger building, you can go double-thick with your plates staggering the pieces all around for strength.
Q: I have plans that I drew up for a 34 x 38 home We are looking at making of cord wood, on a monolithic slab and trusses for the attic space. What would the spacing be needed for the framing system and what is best to use for thickness of the slab?
A: I like a timber frame with vertical 8x8 posts approximately 8-feet on center, so you would need 5 posts on the 34-foot sides, and 6 posts for the 38-foot sides. As the corner posts are common, this is a total of 18 sidewall posts. Girts (sidewall plates) would also be 8x8's. Personally, I would go for four more internal posts down the middle, corresponding to the location of the posts on the 38-foot sides. These would be topped by a girder to help support your attic trusses.
The monolithic floating slab should have thickened edges with a cross-section of at least 9 inches by 16 inches. The rest of the floor can be an honest three inches thick. Don't forget underfloor extruded polystyrene insulation, such as Dow Styfofoam Blueboard. Finally, if you incorporate the four extra internal posts and girders, strongly suggested above, thicken the floor under them to 9 inches, with at least a 16-inch by 16-inch square dimension under the posts.
As for truss dimensions and spacing, this is between you and your truss manufacturer, based upon the roof pitch and the snow load for your area.
Q: I was writing to inquire about building a cordwood home in California (in the mountain areas near Yosemite National Park). How would a cordwood home fair in California with the wind and seismic variables? And what would be the best structural method to consider when building a cordwood home?
A: In a seismic area, it is imperative that you use the method of cordwood masonry where the cordwood is used as infilling within a strong timber frame, sometimes called a post-and-beam frame. If there is a seismic event, the building will shake, but the timber frame, in combination with the cordwood panels, will stop the building from racking. Yes, you will probably get some cracking in the cordwood, but the building will not fall down. This is what people in Latin America are doing now in seismic areas: they are building with a reinforced concrete frame. Then they can infill with bricks, adobe, zucchini or whatever. The frame is the protection against the earthquake.
Q: Once a Cordwood house is completed, can you add an additional room or build onto it? A stick built you can add onto the house. I know earthbag homes its a bit harder since most the earthbag home is connected together. I am starting the planning idea for my (tiny house) cordwood home. I was thinking in the future I may want a sunroom when I can afford more material.
A: Yes, you can add on to a cordwood home. I have done it at Earthwood (trapezoidal cordwood solar room added on to the round cordwood home) and at our summer camp, Mushwood (a new second story of cordwood.) In fact, we are thinking of adding on to it again, a new entry way. Also, many others have added on to their cordwood home.
Now, having said this, I cannot emphasize strongly enough the importance of accommodating for any future additions at the design stage of the first building - your "tiny home." Know how you are going to add on, even before you build the first place. Considerations: Can you install a compatible foundation for the add-on? Do the roof lines make sense with each other? How do windows and doors work in? These considerations are important to adding on to any home, cordwood or otherwise.
Q: I have been considering a cordwood round house for a few years now as a home. My question revolves around earthquake resilience. Have there been any shake table or similar tests with either quoined corner or round house designs?
A: Sorry to say that there are no shake test results - to my knowledge - on either load-bearing round cordwood buildings or stackwall cornered buildings. Friends of ours once built an Earthwood-type house from our plans in Sequim, Washington, a seismic zone. The local code enforcement officer insisted upon a 16-sided timber frame built within the round walls, and I am in total agreement with this. Cordwood is strong on compression, weak on tension. It would not do well by itself against a strong quake. (We have been through several small quakes without a problem, but in the Richter 3 scale, not 5 or 6.) Now I provide sheets showing how to integrate a 16-sided timber frame into our plans. Such a building is called a hexadecagon. (See chapter 20 of my new Cordwood Building book for examples in Hawaii - a seismic zone - and Tasmania.) If Jaki and I were to build Earthwood again, we would include the timber frame, even in a non-seismic area, because it affords the opportunity of getting the roof on first and building the cordwood walls under cover.
Q: In Cordwood Building: A Comprehensive Guide to the State of the Art, you mention 3 framing styles for cordwood masonry construction. I understand why post-and-beam frames are perhaps the most advantageous, however I am working within a fairly constrained permitting approval process and my only real hope of getting my project done in time is to appease the permit officials and use a stick-frame as they are more accustomed to. If I am building a fairly small temporary structure on new land, would it be possible to frame it conventionally and still infill with cordwood masonry? If so, how would you recommend doing this for, say, 8 inch walls? Perhaps there is an obvious reason that this is not possible, but I have not seen it discussed anywhere and would love your take.
A: Easiest way is to frame with 2 by 8s instead of 2 x 4s. Or doubled 2 by 4s scabbed with 1 by 4s, which would also serve as key pieces, tying your cordwood to the frame.


